Grab Dr Brassy's Blogger Badge

 photo 8ba4e6b6-d2a7-4111-93c1-be0ead57b733_zps042c7e63.jpg

Tuesday, February 4, 2014

How to become a Master Manipulator (With Brass Stampings) - The Thrifty Maker finds the Stamping within the Stamping

I've been a Master Manipulator for years. I might actually be one of the best you've never heard of, but before you get worried that I have taken advantage of you in some way, let me show you what that actually means...


THE IDEA

Often in my work, someone will say "I have never seen that stamping before, I don't know who you get your supplies from, but I bet it's a Secret". Well.....Yes and No. The first rule of SupplyClub is, "Don't talk about SupplyClub!" (I think this is a joke, but if I should disappear shortly after this blog posts, we will know I was mistaken).

Onward~~~~~~
I buy my supplies from the same places you all do, I just use them differently (here is where the "Master Manipulator" stuff comes in). I make it look like it's a piece of unobtanium (aha, all the Steampunks just woke up and took notice). Same stamping, different use, the Dr Brassy way. Continue on........

Buy it here


This piece can be found in my Steampunk Supply Store here: Steampunk Supply Store
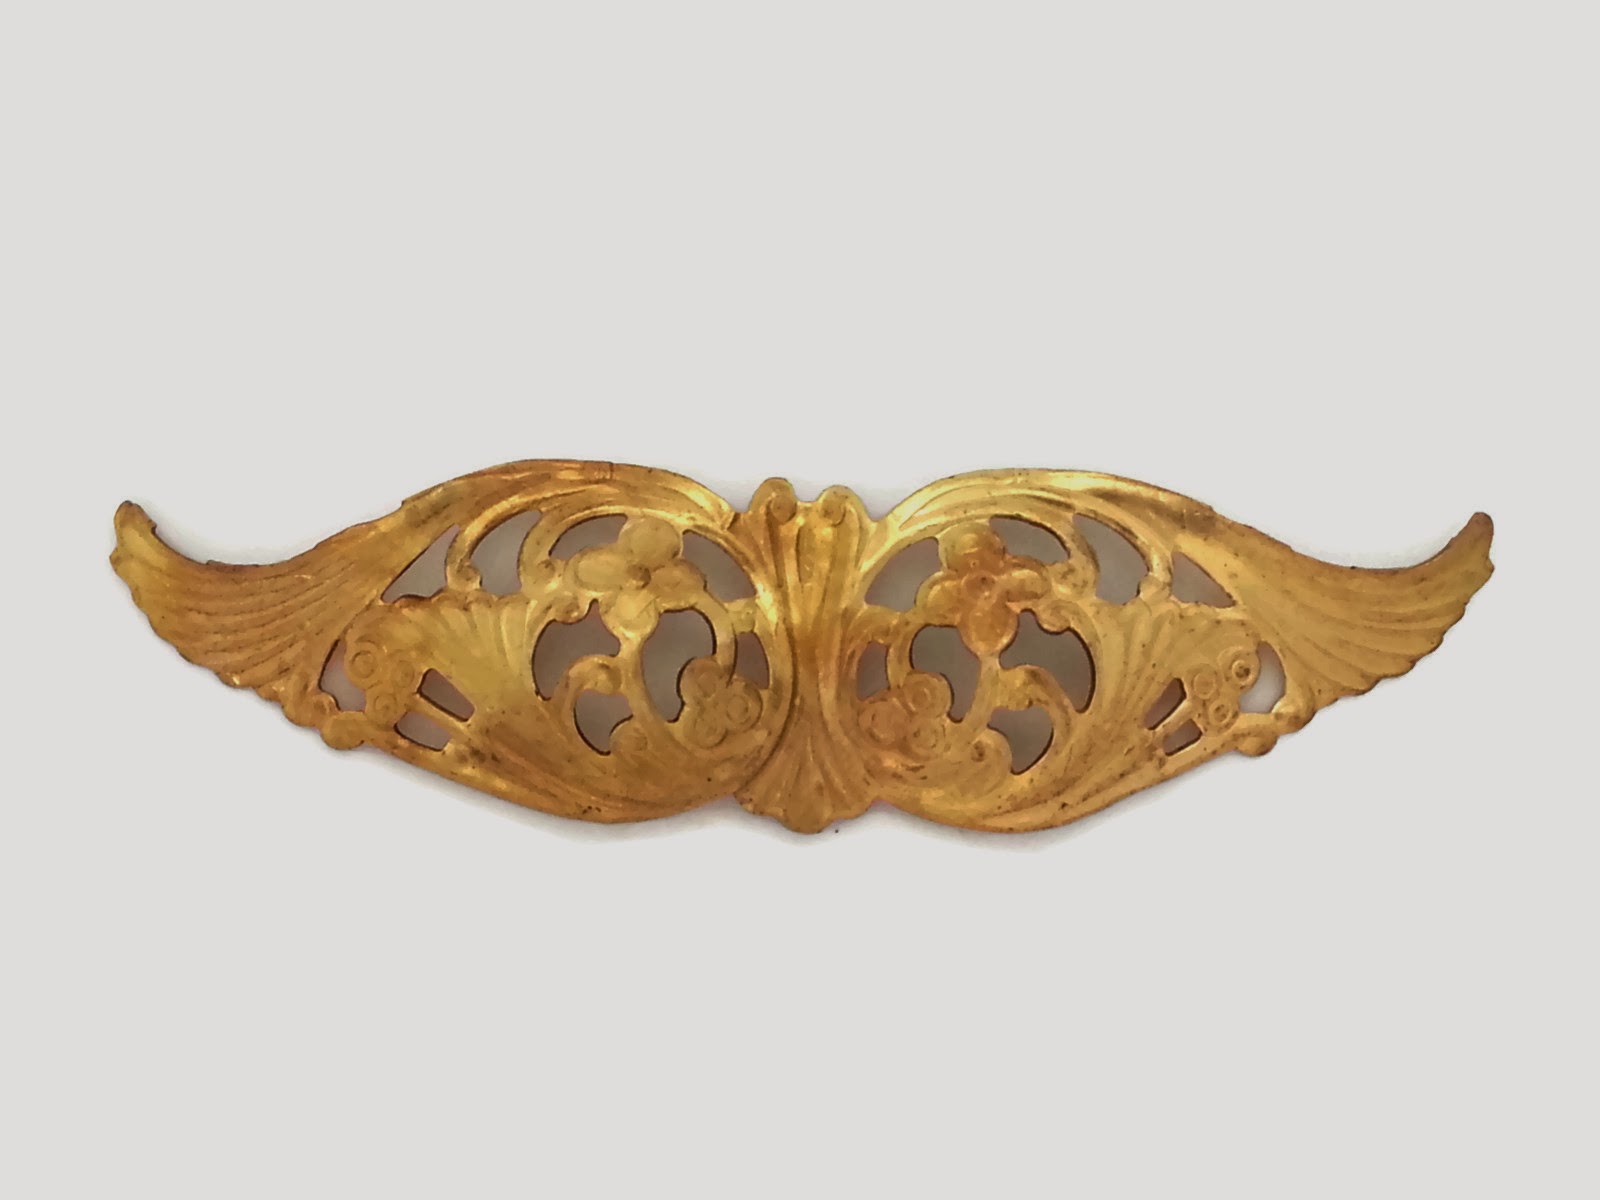
The first impulse would be to use this on a cuff or as a large brooch. The piece is large and can be intimidating. But if you look for the stamping WITHIN the stamping, you will see that this can actually be a set of wings and suddenly THAT big scary stamping over there <<<< becomes, THIS lovely cabochon necklace right down here  (See Below)
   Buy it here 
 
You can start to see where you can buy a large stamping for  $5- $6 and turn it into 2-3-4 or more pieces, which not only extends the creative possibilities, it also extends your buying power. I can easily see this piece separated into three unique stamping pieces for even more versatility and if you are especially adventurous, 6!


Let's try another one:  Everyone's favorite Filigree Garden Dapt Stamping!  Buy it here
Filigree Garden Dapt Stamping

 For years, I thought nothing more to do with this than to add a stone to the center.

But see here the genius of what Maker, Harry Wood of OscarCrow Designs does with it in his "Dark Eye Necklace Like the All Seeing Eye"- piece. His use of the garden filigree as eyelids by splitting the piece in two-sheer brilliance! 

Dark Eye Necklace by Harry Wood of OscarCrow

For all your Antique German Ceramic/Bisque/Porcelain figurine and Handmade Raku needs, see Harry's shop here OscarCrow Supplies

The list of stampings that are yearning to be wings is endless.  Here is one that has 3 sets of wings in it plus a very useful navette shaped center piece and two moon crescents. Just think of all the things you could do with this one stamping!


Cutting tools

THE TOOLS

Ok so we are starting to see the possibilities- but how do we go about taking that one large piece and whittling it down to manageable smaller pieces? I start with Industrial Strength tin snips from Ace Hardware. Not only because they make me feel womanly and powerful, but because they do the job with very little effort. As I have severe arthritis in my hands, anything that helps me manipulate metal, is welcome.

Sanding tools
The tools you will need to become a Master
Stamping Manipulator (above)  can be found at any craft store or hardware store.

You will also need something to round off sharp edges and buff your brass smooth so it doesn't cut your customer (or you!).  A Dremel, sand paper, or nail supply emery boards or nail sanding blocks are all great tools to use (see right).

 THE PROCESS

Now that you have the tools, we can talk about the process. You want to be sure you cut along the natural creases in the piece. You will sometimes get lucky and a simple bending back and forth on an indentation will naturally separate a piece. For more ornate designs, tin snips, cutters/cut nose pliers, flat end cutters and heavy duty scissors, work well.

Once your piece is cut, you will want to trim off any excess, then sand down the rough edges till they are smooth, a Dremel works well or even Beauty Supply Store Nail buffers, sanding blocks and emery boards.

 *** Dr Brassy Hint- If you are using a plated brass stamping, be sure to finish those raw brass edges with the same color plating as on the rest of the piece. You can use alcohol inks, paint pens or Swellegant metal finishes. This is what the professionals do to get the best results.

THE FINISHED PIECES

Now you get to sit back and relish in how smart and thrifty you are!!! You took a single brass stamping and made it your own with more pieces and more possibilities for you to be a Master Manipulator (of brass!)

Below is one of my current favorite pieces to use because of it's Nouveau Paisley Leaf shapes and versatility. 

The top row is the original Long Nouveau Floral Stamping  Buy it Here
The middle row is the stamping split in two
The bottom row is the stamping split into four pieces

Long Nouveau Floral Stamping
Sometimes a brass stamping doesn't even need cutting to be manipulated and used to it's full potential. All it needs is a little push with a ball peen hammer to flatten it out and what was a bead cap Buy it Here, becomes a cross base piece for a Steampunk Propeller Cuff. See here:

Bsue Item # Cap03460
Buy it Here


Here is another piece that intuitively wants to be wings and I did indeed separate the piece into two, but instead of wings


I did these 
"Drops of Jupiter" Earrings 
which my customer loved!


So now that you have all the tools and secrets, I expect you all to go out and try this. Find your inner Master Manipulator and even save yourself some cash. A Master Maker does the impossible with nothing. We are getting really close to that here. Happy Makering!

Much Love in E-Steam,

~~~~~~Dr Brassy 

Thursday, September 5, 2013

Brass Etching the Dr Brassy Way - Jump into the Deep End of Fancy Brass


There is so much beauty in raw brass. It's golden, pure, lovely and a blank canvas for whatever your artistic talents want it to be. But what do we do with it? If you are like me, you glued or riveted other things to the blank golden landscape of brass, trying to make it fancier, prettier, something-ier. I did that too and still do that. But then I got really fancy!

I took a class from a very smart man indeed. Mr. James Faraday (Not his real name. His real name is Professor Sexy Pants, but you can see why he changed it for public purposes).  Oh, and he is married to the very lovely Mrs. Sexy Pants, so don't even go there.  Anyways........

The class was at Clockwork Alchemy 2013 and it was on Brass Etching. I had been (wait for it....) just "Itching"....to take this Etching Class and only 50% of it had to do with the joy of being in the company of PSP himself. I had done some brass etching previously with some minor success (and lots of failures and disappointments because that is "The Brassy Way") so there must have been some magical "something" I was missing and gosh dang it, I was going to find out what it was.

Pre-class my pieces looked like the survivors of some tragic chemical warfare, dug up from the ruins with a vague design remnant that remained for the Archeologist to decipher what the heck it was trying to be.  "Is that a Velociraptor or a Bumble Bee?" they would question. To tell you the truth, I was not sure myself sometimes. 

But after the class.  After Professor Sexy Pants....I mean....Mr. Faraday's instruction, my pieces are not only Steam Worthy but Brassy worthy as I am hardest on myself. I came out of that class with a renewed zeal to get down and dirty with my newly honed brass etching skillz.

Here is what you need.....

SOME BRASS (yes I know, this seems like a forgone assumption, but hey, you never know). I like to buy mine from local, USA Companies. Foreign brass can be contaminated, so buy USA when you can.


 2 Inch Smooth Cuff


Raw Brass Base Connector

 Raw Brass Base Connector


I see fancy gears here. I know. I see fancy gears everywhere!


Wide Slotted Cuff Base    
 Wide Slotted Cuff Base


Pendant Stamping Raw Brass


Am I the only one that sees a filigree stained glass window here?


A VIRGIN

HA! Just making sure you are paying attention. Read on......

SOME ETCH

Radio Shack like totally owes me royalties folks
 You can use Ferric Chloride solution from your local Radio Shack. This is what I use and it's easy and somewhat inexpensive ($9.95). There are a number of other methods that involve Salt Water Solution, Miracle Grow, Dragon Armpit Excretions and Hydrochloric Acid/Hydrogen Peroxide Solution.

I am going to talk about the Ferric Chloride way....but first some safety tips from Dr Brassy.

WEAR GLOVES AND A FACE MASK AND EYE PROTECTION!!! (Sorry, didn't mean to yell).
Never use Aluminum Foil as a base for this project. The Ferric Chloride has a volatile reaction with aluminum. It will also ruin your beautiful stainless steel work table. The best protective covering? Plastic. A regular old garbage bag, split open and lain out to cover your work area is great. Do not do this around children or pets or dragons.

On to the fun stuff!

Clean the brass well with Acetone (this is nail polish remover).

I then use a buffing/sanding sponge to buff the brass to make sure I have gotten an even finish that is devoid of any coating or oils (This is an extra step that I like to do).

You can use a stencil, a photocopy image, a rubber stamp image or just a sharpie pen, to transpose your design onto the brass. *(Wear gloves! You don't want the oil from your hands on the brass). This is called the "Resist". Wherever you have the ink, it will form the high points in your design. If using a photocopy image, you can try a hot iron to transfer your image to the flat brass. Then fill in with the Sharpie Marker or oil based paint pen (Must be oil based). If you are using a rubber stamp, simply stamp on an oil based ink like Staz On and then dab off extra, then stamp on your brass. *This is great for cuffs or other bent pieces as the stamps are pliable.

Let your Resist/Ink dry completely.

Use painters tape/masking tape to tape the back of the piece. Otherwise the etchingsolution will etch both sides of your piece and thin the brass out significantly instead of just etching your design on one side. Tape off any areas you wish to remain intact.


Pour the Ferric Chloride into a plastic container (I use one of those .97 shoe boxes from Home Depot).
Make sure it is deep enough to cover your pieces.

Place your pieces in the etching solution. You can leave them there or agitate (swirl it around) the solution. Be careful not to agitate too much as it can undercut the etch pattern and collapse your design lines. You will see bubble lines if you leave your pieces and do not agitate. Some people are fine with that and some are not. It's up to you.
Pretend this is a square plastic shoebox

Leave pieces in for 30 minutes to 2 hours depending on the gauge (thickness) of the brass and the depth of the design you would like. Always check every 15 minutes! Your brass can dissolve into nothing before you know it!

Use a long wooden shish-kabob skewer or wooden toothpick to test the depth of the etch until it gets to the depth you would like.

Be sure and wear gloves when handling anything during the etching process and wash etching solution off immediately. (It won't burn your hand if it is on there for a few minutes, but better safe than sorry).

When you get the depth you like, remove from etching solution and wash brass pieces in warm water.
Orange powder on these is normal

Remove masking tape and discard.

Put clean brass in warm oven to dry out completely. About 20 minutes should do it.

Pour Ferric Chloride back in original bottle (the plastic shoe box now makes a great pour spout).

Rinse shoe box container well and dry.

Once brass is dry, use 320 sandpaper and/or acetone and/or denatured alcohol to remove Resist/Ink.

Sand edges in case they have become sharp.

Patina to make etching even more rich looking and distinct.

Seal: Krylon/Ice Resin/or another sealant.

So what will you have when you are all done? Something like this maybe? YES!

Filigree etched cuff by Dr Brassy
Etched Brass Cuff by Dr Brassy
F.A.Q. (Frequently Asked Questions).

Q: Can the solution be reused?
A: Yes.

Q: Can we pour the used solution down our copper sink pipes?
A: Never

Q: Will this etch copper as well?
A: Yes

Q: I tried this and it did not work. Why might that be?
A: It's possible that your "Brass" was not actually Brass. Only buy from reputable supply sellers.

Q: Should I take off my wedding ring when I do this?
A: Yes! It will etch the gold if you spill on your ring.

Q: Why are you going to all this work and effort to share this with us?


(A) I am like the Mother Theresa of Steampunk and am working on my Sainthood.
(B) I am an attention floozy.
(C) I am building a bigger fanbase so when my book publishes it will sell and I can pay my Editor the $100.00 I owe her.
(D) My Mother taught me to share.
(E) I am actually just nice like that.
(F) All of the above.

A: (F)

Love You All (In a friendly, warm, but not creepy way),
~~~ Dr Brassy


Thursday, August 29, 2013

The Secret Language of Steampunk Makering and Finding Inspiration in Everything

Some people are just born Artists. They live, breathe and sleep, Art. In fact, if they have an accident and bleed, I bet you 1,000 Art Gallery Openings that the spilled blood would magically ooze into some Monet worthy landscape or Dali-esque dripping clock. These people are the reason I have an infinite supply of Ibuprofen on hand. They give me a headache. Not because they are so talented or it comes so easy to them. Because they take for granted the gift that they were born with and can often be heard dismissing some indescribably ethereal piece of work as "Oh that?-Meh, it's ok I guess. Not my best work."
Actual Monet that looks like it was made with blood

Real Artists wear bath robes
 These are the same people who jump out of bed in the morning looking like Super Models. You know who you are, now stop judging me, while I wear my bathrobe (at 2:38 in the afternoon) sporting 2 weeks of leg hair stubble. I am monkey girl Brassy and I am a WORKING artist dang it! 

Your own Dr Brassy does have to work at it and I mean WORK AT IT. I strruggle, I freeze, I get artists block, I stare at beautiful brass filigree till my eyes bulge out and I get...Nothin'. So I walk away and do something else that usually involves playing with the cats or rearranging my sock drawer by color. You know, really important stuff.


BUT THEN! I spy something out of the corner of my eye. It could be something completely innocuous (I always wanted to use that word in a blog post. I have NO idea what it really means but I think it has something to do with getting a shot in your arm), and BAM! I've got inspiration, so off to the studio I go, to maker something before the feeling passes and I am back to throwing fuzzy mice on a string to Cassiopeia.  Inspiration often comes from the most bizarre places. Like my Asthma inhaler was inspiration for a piece. The sample kitchen tiles that I got in the mail from Fasade/Home Depot sparked another idea (See below).
Wants to be a Steampunk Wall Clock

Steampunk Wall Clock Realized
The bicycle gears that my ex brother-in-law saves for me are also fodder for inspiration. Inexplicably, a garbage disposal replacement, became an inspiration and it was not just to remind my husband for the 10 Millionth time not  to put avocado pits down it. I can't tell you why or when these "Aha" moments happen-Just that they do and when they do, I run with it.


Dr Brassy Zombie and Sightmares ™ ©
I guess I shouldn't be surprised that being a Working Artist is 98% work and 2% Art. At least for me. I have worked far less hours, for far more money and had far fewer heartaches, at the many mundane jobs that I have held through my life. But at the end of the day, who is going to remember that nice lady in Human Resources that handed out the paychecks every Friday? No one. I am hoping history will remember Dr Brassy and her Sightmares ™ ©Pocket Watcher Eyes and there will still be a Dr Brassy Wikipedia Page that shows the world once loved that silly redhead from Mythbusters with the freaky eye jewelry (No, not the skinny hot one named Kari, the one that looked like a Zombie in that Mythbusters/Walking Dead Halloween Special Episode-Yea, THAT redhead!).

So while I am waiting for my airship to come in, my hot air balloon to dock and my submarine to reach port- I wanted to share some of my inspirations and finds, in the hope that maybe I can be your garbage disposal or your asthma inhaler (You know what I mean).
 
Now here is a piece from Bsueboutiques Supplies
Bsue Item #brox0205

Is it just a brass circle stamping (On the right)? Or is it a magic porthole to another dimension (On the left)? Is it a window? A magic mirror? You decide! It can be anything you want it to be. I wanted it to be an underwater dive helmet window to a world under the ocean. So that's what I did. Or maybe it's the porthole into a radiation chamber where our hero is trapped and needs to be rescued. Or maybe a containment locket for an Alien life form. Again....you decide what something is, or wants to be, based our your vision.

I've been going around the house this week looking for things to 'Steam'. Everything from my husbands eye protection work glasses (made him a chain with gears so he can hang them around his neck), to "Steaming" his walking cane with filigree. Everything is fair game and anything might be commandeered to be taken apart and made into something else. Believe it or not, this helps me with my jewelry design. I come across the best ideas for my jewelry, when I am doing something else totally unrelated. 

Brass drawer-pull base plates

See these drawer handles? I think they might be bracelet cuffs in the future, but it also got me thinking about metal stamping.

Why am I not doing that?
 

So I did.I bought thin copper, brass and aluminum sheeting and I started stamping it to make my own designs. I have so many ideas on how to use these. Cuffs, pins, hat pieces, corset inserts, cane wraps....the list goes on and on. But the initial inspiration? An antique brass drawer pull base plate.
Printed metal sheet
 
Ask yourself. Is it a piece of copper fitting for your kitchen sink? Or is it a mini submarine? Is it an empty glass perfume tube? Or is it a teeny tiny light bulb? Is it a brass pipe fitting? Or is it a goggle lens holder? Is it a curtain hanger rivet? Is is it a top hat exhaust/air hole?
Goggle makings


See the secret that each and every piece holds. See what it wants to be. The life it wants to have. Then use your hands and your talents to breathe this new life into what was merely a supply. Like a metamorphosis, give it a brand new purpose, make it alive.

 If you are one of those people (Unlike me) who doesn't really need to even try. Then I apologize for taking your time, Oh and the Louvre called, your next exhibit is Thursday and your book publisher says Volume 6 is due. For the rest of us...read on.....


This was another pile of "Really wants to be something else"-Stuff in my studio. I got a request Monday from the nicest lady who wanted to know if I could make a camera themed top hat? "Hum", I wondered. How to give the appearance of an antique camera coming out of a top hat without it being so heavy, that wearing it makes you feel like the Hunchback of Notre Dame? Then inspiration hit!


*Glass Art bubble courtesy of B'sue Boutiques Supplies Item# base08904-
Large round filigree brass porthole also from B'sue. Bsue Boutique Supplies on Etsy

Camera???

And this is what I came up with. It feels like an antique, very fancy camera. It has elements that say "Camera", without adding 20 pounds of weight to the hat.

I am still working on the LED lights for behind the lens and some more brass filigree to mimic the shutter, but the gist of it is very camera-like and the customer, so far, is thrilled.

I will be sure and post photos of the finished piece on my Facebook Fan Page Here:  Dr Brassy on Facebook

and to my Facebook Business Page here:  Dr Brassy Steampunk on Facebook
Camera Hat by Dr Brassy

Just this one project has me so excited and rejuvenated that it has launched at least 6 other project ideas. Like incubated artistic eggs, one hatches and then the next and the next.....then pretty soon there are all these little Steampunk chickens, running all over Steamington Manor. It's a Zoo I tell ya!
I know...It's  a duck. Use your imagination...

Don't be afraid to get inspiration from other Artists. Emphasis on "Inspiration". 

Raku by Oscarcrow-Harry Wood
Like this little man. Gus the Gasmask Boy. The Raku helmet and the porcelain boy and arms are from the very talented Harry Wood of Oscarcrow on Etsy

I added the geared eyes and put him together. This is just for me. Just a friend to keep me company in the studio in my "Odd and Beautifully Weird" curio cabinet. He is now whispering ideas to me on a daily basis....or maybe it's still the voices in my head. Some days I am not sure who is talking, but I listen to who ever has the best ideas. 

This is another inspirational piece from Artist Tempest

Pewter bird skull by Tempest

I haven't yet figured out what to do with this yet. The bird skull is being saved for a brilliant moment to hit that will do it justice. It's currently hanging out with Gus and they are becoming very good friends.

Paris Architecture
This is another inspiration. A bridge, or maybe arch or column. I'm an Artist not an Architect, so maybe it's all three. Random huh?


Brass etching pieces remind me of this bridge and it's what got me really excited about the process after learning the basics at James Faraday Brass Etching Class at  Clockwork Alchemy 2013.
Etched brass and copper sheets
An antique lamp for inspiration

   
Laser filigree buttons for inspiration 


So I hope you have learned a thing or two or taken away artistic rejuvenation from this blog post. Always know, this is how I feel about all of you. Now go out there and maker something!!!!
Love .....Dr Brassy